
If you have been handed over the turkey roasting this year and are nervous or have had more misses that hits, then let’s talk turkey! No need to stress over this, really. The key here is good notes and understanding technique. I’ve jotted down a bunch of notes to make roasting turkey easy. Speaking of easy, there’s no basting.
Yes, really. NO BASTING. The greased cheesecloth prevents the juices from evaporating while keeping the skin moist – my savior for foolproof turkey.

This is my new thing … bye, bye hot-oven-air-in-my-face-every-20-minutes basting.
My first turkey was golden brown and seemingly perfect. I may have basted it a dozen times out of worry. Then when my husband carved into it (meaning immediately, per my not experienced instructions) all the juices ran out and it was sadly dry all over by the time we sat down to eat. It was also very dry in the thigh meat because little did I know and roasted it with thigh side up. Not a very good turkey back then (more like so horrible that we feasted on all the thankfully tasty sides and dessert), but after testing (many) different methods this yields the best results and most flavor.
As you know, I’m usually itching to put a twist on the traditional, but with turkey and gravy, I like to keep it simple. Not much changes with it every year other than little tweaks to simplify the process. The gravy is so simple and doesn’t taste heavy like gravy can sometimes. It comes together in minutes and heats well while getting everything else ready. We love it on stuffing too. Last year’s turkey was a combination of fresh and dried herbs.
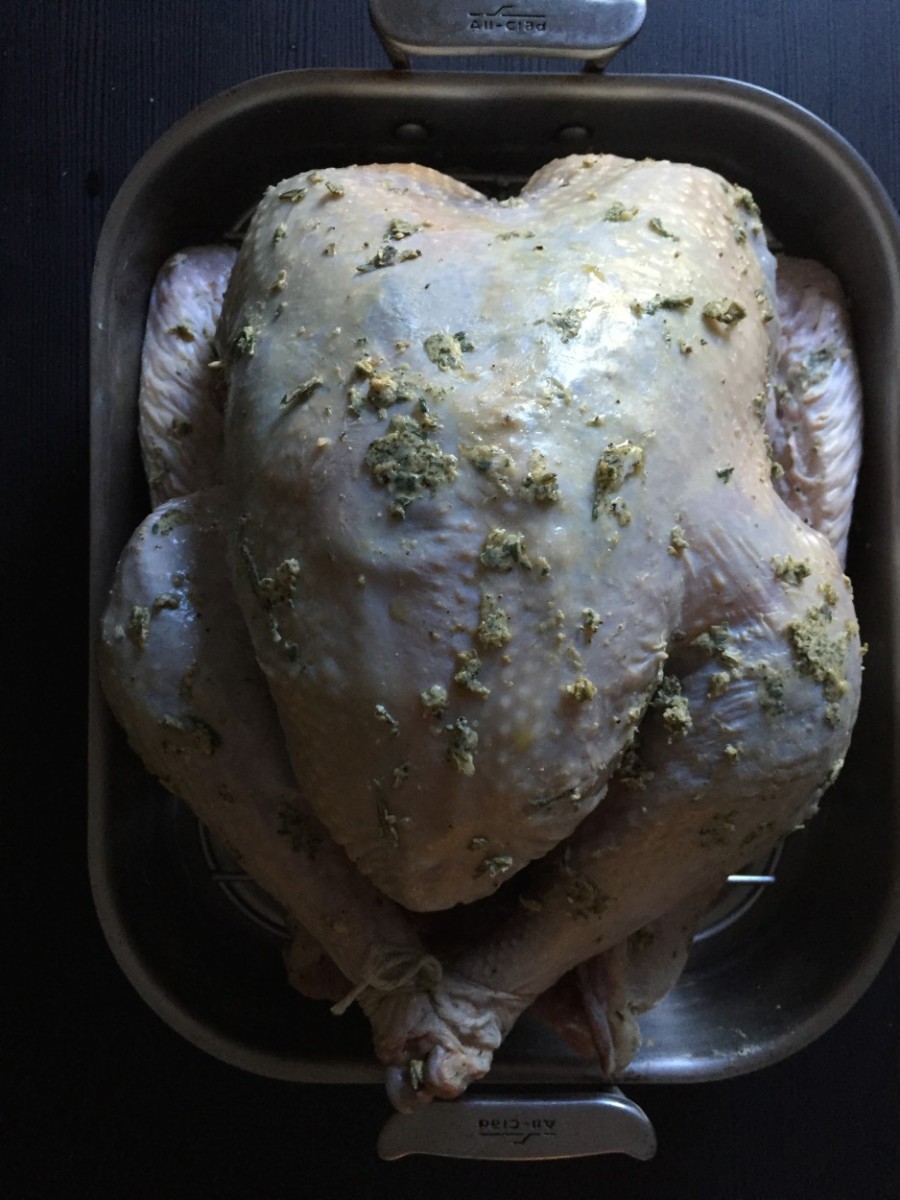
This year I’m going with all fresh herbs. The best tweak, since, is the cheesecloth. I’ve roasted a few this way (I’m not the only one who buys a few to keep in the freezer, right??!?) with perfectly cooked results. But before we add the cheesecloth, it’s crucial to dry the turkey, inside and out, to get a crispy skin. I find the pat-with-paper-towels method ineffective, instead, I turn it upright over the sink to drain excess liquid then transfer it into the roasting pan to air out on the kitchen counter while I tend to other things.
I find the pat-with-paper-towels method ineffective, instead, I turn it upright over the sink to drain excess liquid then transfer it to the roasting pan to air out while on the kitchen counter. I make the seasoning rub, tend to other things, and when the skin appears dry I season it.
While the turkey sits out it helps take the chill out, important for two reasons: a) if the turkey is too cold the skin may tear when seasoning (under the skin) and b) it will cook unevenly and likely near raw near the bones.
Many brine their bird swearing it makes the best turkey; I boldly tried brining (two 14-pound turkeys) one year to see what the fuss was about and while it was moist, it wasn’t any more ‘moist’ than a seasoning rub the day before but it did take up most of the room in my second fridge while it sat in my enormous soup pot (We had to remove a shelf. Can’t imagine doing this with one fridge!) forcing me to do more day-of cooking. Stuck in the kitchen like a hot (stressed-out) mess is no way to celebrate Thanksgiving.


Another note, fresh herbs have a milder flavor than dried herbs (especially ground sage), which I prefer given all the different foods on the table – still very flavorful yet not overpowering.
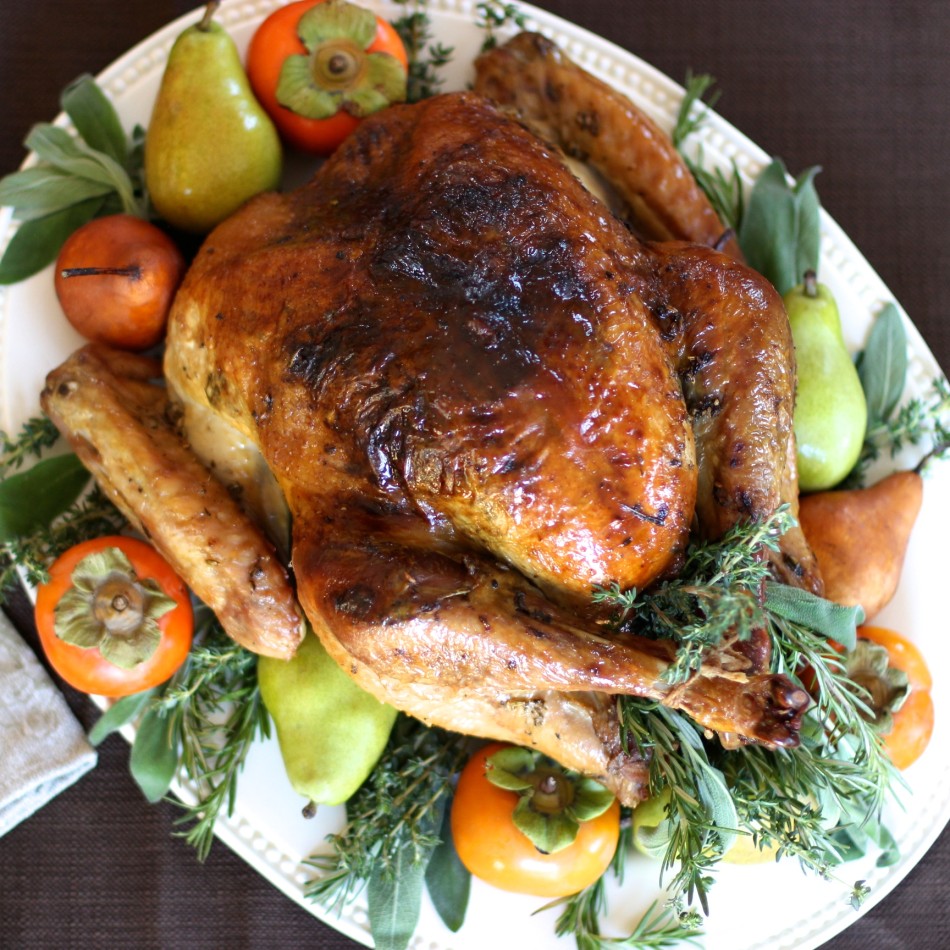
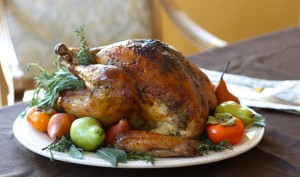
It’s moist on the inside, yet crispy on the outside, with a seasoned herb mixture in between … a combination I think your guests will be thankful for and easy enough to have you enjoy roasting turkey year after year.
And…for some stuffing recipes from last year try cornbread stuffing with chorizo, or a lighter, meat-free mushroom leek stuffing. Also, some sides like sweet potato casserole, brussels sprouts.
For some dessert ideas … no-bake pumpkin cheesecake if you don’t feel like baking and if you do feel like baking how about apple pie or apple pie spice cupcakes, or a pumpkin bundt cake … find more recipe in the archives if planning ahead or stick around…I have some desserts coming this week!
- Note: You will need a roasting rack and an unbleached cheesecloth (folded 2-ply and large enough to cover the turkey).
- 1 -
15 pound turkey,organs and giblets removed from cavity* - 5 sprigs of fresh rosemary (about 4-inches high), stems removed
- 10 sprigs of fresh
thyme, stems removed - 15-20 leaves fresh sage (one handful), stems removed
- 4 tablespoons PLUS 3 teaspoons kosher
salt, divided - 2 tablespoons black pepper
- 4 tablespoons PLUS 3 tablespoons non dairy buttery spread,divided (I use Earth Balance soy free spread)
- juice of 2 lemons
- 3 tablespoons olive or vegetable oil
- 5 cloves garlic
- *If frozen, it requires 3 days to defrost in the refrigerator.
- FOR GRAVY: (updated 11/25/16)
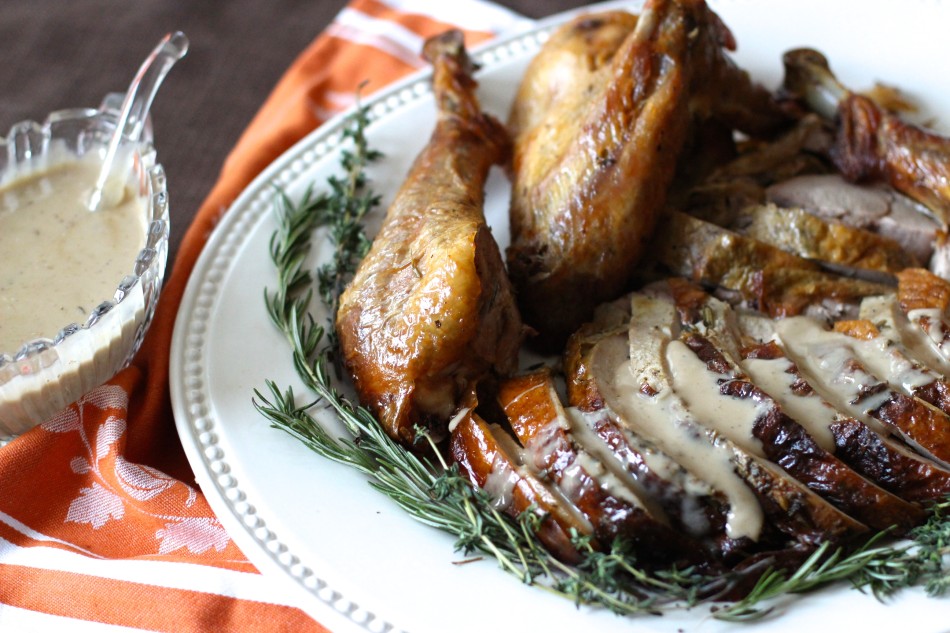
- all the fat drippings on the bottom of the roasting pan, any solids removed ( about 3 cups)
- ½ cup tapioca starch
- *Please read notes below before beginning to yield best results.* COOK TIME includes resting meat.
- Preheat the oven temperature to 425 degrees F (218 degrees Celsius) with the oven rack placed in the lower part of the oven.
- In a mini food processor, pulse all the fresh herbs, 4 tablespoons kosher salt (3 teaspoons set aside), black pepper, 4 tablespoons non-dairy spread, lemon juice, olive oil and garlic until herbs are well minced.
- Place your turkey in a roasting pan, set on its’ rack. Doesn’t matter which way now since we are seasoning.
- Wearing latex-free gloves (to prevent ruining your nails!), rub the seasoning mixture under the skin and the inside cavity. To do so, gently detach the skin from the meat with your fingers (not nails) then grab a heaping handful of herb mixture then push your way under the skin, rubbing herb mixture as you go. Repeat until both sides of the turkey is seasoned. To prevent ripping the wings, gently push only under the wings where it’s attached to the breast. Don’t force it,
otherwise the skin may tear. - Note: This step does take a little time, so give yourself 20-30 minutes to season. Music in the background is always nice.
- When fully seasoned, set turkey breast side up. Gently twist the wing tip (the first joint of the wing) and push it under the thigh. You may need to give it a bit of a push as it can be resistant. Then push the drumsticks together, one on top of the other, and
truss , or tie with twine (sold in supermarkets or cooking supply shops) by looping in between (drumsticks) then under, and over several times — kind of like making a figure eight out of twine, securing the drumsticks securely (this helps prevent too much air circulation, which can result in a dry turkey). - Pull the neck skin to cover the meat, then melt remaining 3 tablespoons non-dairy butter and submerge cheesecloth to fully coat and cover the turkey completely.
- Cook at 425 degrees F for 1 hour then reduce the heat to 325 degrees F for 90 minutes. The cheesecloth will be dark and very dry, clinging to the skin. Be careful not to pull the cloth off quickly, it's hot and may also tear the skin. Do not carve into the turkey to test for doneness, it will dry out the turkey.
- Note on doneness: poke an instant-read thermometer somewhere between the leg and thigh (do not touch the bone or it will not read accurately), when it reaches 160 degrees F it's ready.
- To easily separate: spoon some hot fat drippings over the cheesecloth then gently lift it off. Spoon more fat as needed until completely off. You should have dark, amber looking crispy skin underneath.
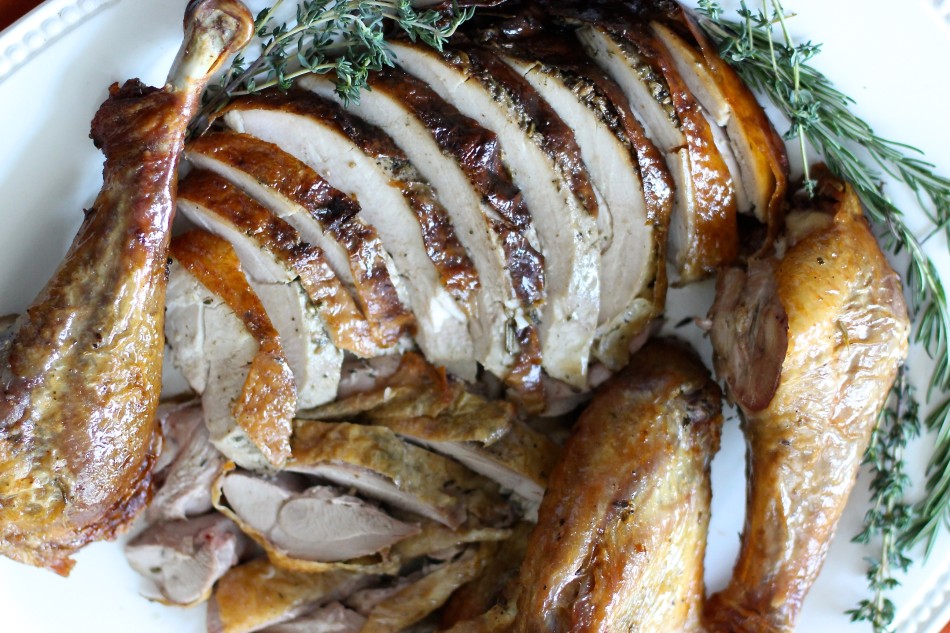
- Turkey temperature will continue to rise another 5-10 degrees while the turkey rests and reach the optimal 165 F temperature.
- Transfer turkey to a carving board and loosely cover with aluminum foil, let rest for 20-30 minutes before carving. Meanwhile, prepare gravy.
- FOR THE GRAVY: (Updated 11/25/16) Set your roasting pan, containing strained drippings, directly over medium-high heat. When it comes up to a boil, add tapioca (evenly across the drippings) and whisk continuously for a minute or two until it begins to thicken. Transfer into a heat-safe bowl and bring to a smooth consistency using a hand-held immersion blender. This will remove any stubborn lumps and thicken it even more. I originally combined water with tapioca starch then added the slurry to the fat drippings. This year I added more starch, without the water and immersed it right in the roasting pan. I don't recommend that, though, better to transfer it since the hot gravy can splatter! Using the immersion blender created a smoother gravy in less than a minute, instead of the laborious whisking for 5 minutes.
- More tips & notes:
- Keep an oven thermometer in the oven. I have one in both of my ovens to ensure the temperature is accurate before cooking or baking. The temperature the oven says or beeps at when it’s ready is never accurate!
- Remember to allocate enough time for seasoning, roasting, AND resting the turkey - about 3½ to 4 hours.
- Turkey should be close to room temperature. Roasting a turkey straight out of the fridge (or still very cold) will NOT roast evenly, instead keep it out at room temperature for an hour before seasoning.
- Make sure to remove the plastic that secures the cavity to the drumsticks before roasting.
- No need to baste your turkey! I used to roast the turkey breast side down to allow the fat from the dark meat to drip down and baste a few times, but now follow this method (cover with greased cheesecloth) that I learned from my uncle. The cheesecloth makes roasting turkey foolproof - it will do all the work until the very end.
- Basting while the oven remains open lowers the oven temperature, this can affect the roasting time and yield inconsistent results depending on how many times the oven was opened.
- You can season the turkey the day before, cover and refrigerate. Bring it to room temperature (at least an hour) before roasting.
- For a larger crowd: try roasting two smaller turkeys rather than one big one to give your guests more drumsticks and thighs. Average 12-pound turkeys will need 45 minutes at 425 F then 70 minutes at 325 F.
- If you are buying a turkey that has been brined then omit the salt, and just sprinkle a little evenly on the skin.
- If you like to roast the neck and giblets, place somewhere inside roasting pan, not inside the turkey. It should also be covered with cheesecloth.
- Defrost a frozen turkey 24 hours per 5 pounds. A 15-pound turkey needs 3 days in the refrigerator, so figure Sunday before Thanksgiving as the last day to buy a frozen turkey.
- Organic, non-GMO turkey does not contain any pesticides, glyphosate, and arsenic. It is also hormone & antibiotic-free. Costco and Whole Foods have Organic turkeys here in Southern California, check your local retailer if possible. For your health, a little extra cost for organic goes a long way 🙂
- Many recipes state to roast turkey at 350 degrees for 30 minutes per pound; I find this dries out the turkey and does not yield a crispy skin (as I learned from experience). For me, it would yield perfect dark meat and dry white meat, not a winning combination for guests! So I threw that method out and have been roasting it this way since.
- Another thing I don’t do: stuff the turkey! I did this one year (think it was 2004, the year the twins were born) thinking the turkey juices will take my stuffing to a whole new level, instead I got soggy stuffing and a turkey that wasn’t cooked in the center because it was stuffed. I had to cut it up and serve it in its' juice as "turkey au jus" - another method out the window!
- For the gravy: in prior years I have found that tapioca starch makes the gravy too gummy. The best is cornstarch. If you are corn-free, try potato starch (not flour) for great results.
Don't miss a recipe! Subscribe here.

Comments